|
|
Post by thefinespunfox on Apr 27, 2016 16:26:56 GMT -5
Hello! I looked through the common problems thread to try and weed out some issues before posting, and although I did manage to fix some double vertices, I haven't found anything to fix this: s42.photobucket.com/user/quote_nothing/media/sleevetexture_zpsw2xbf52r.png.htmlIt's such a slight bleeding that I didn't even notice it until after I had already made several recolors and tested in CAS. At first I thought that perhaps the texture on the sleeves was a little too long and tried to shorten it, but it did not help - once it was short enough to hide the weirdness on the inside of the sleeve, it was too short on the outside causing a flesh texture to appear. I then thought perhaps it has something to do with the RLES file... but there is no RLES file? Now I did import my shirt mesh to a nude mesh top, is that perhaps the problem? I've seen people import meshes to similar shaped files and I tried that, too, but nothing was quite the right shape and it looked even more messed up. Now I simply feel stuck. @_@ |
|
|
|
Post by MisterS on Apr 27, 2016 16:36:08 GMT -5
Looks like a UV map issue, upload your package file somewhere and we can look
|
|
|
|
Post by thefinespunfox on Apr 27, 2016 16:40:52 GMT -5
|
|
|
|
Post by inabadromance on Apr 27, 2016 16:47:27 GMT -5
The problem is the sleeve isn't closed. I recommend re cutting the mesh again, leaving one extra row of vertices on each sleeve to use it for closure. Select the extra row of vertices and merged them to move them inside the sleeve.Then re map the inner sleeve. That or map the sleeves somewhere else.
|
|
|
|
Post by MisterS on Apr 27, 2016 16:58:44 GMT -5
Yeah it needs to capped like this (this is a ea mesh)  |
|
|
|
Post by thefinespunfox on Apr 27, 2016 17:05:30 GMT -5
Okay I'm giving it a whirl, but admittedly I'm not sure how to re-map the inside of the sleeve? :/
|
|
|
|
Post by j on Apr 28, 2016 6:18:22 GMT -5
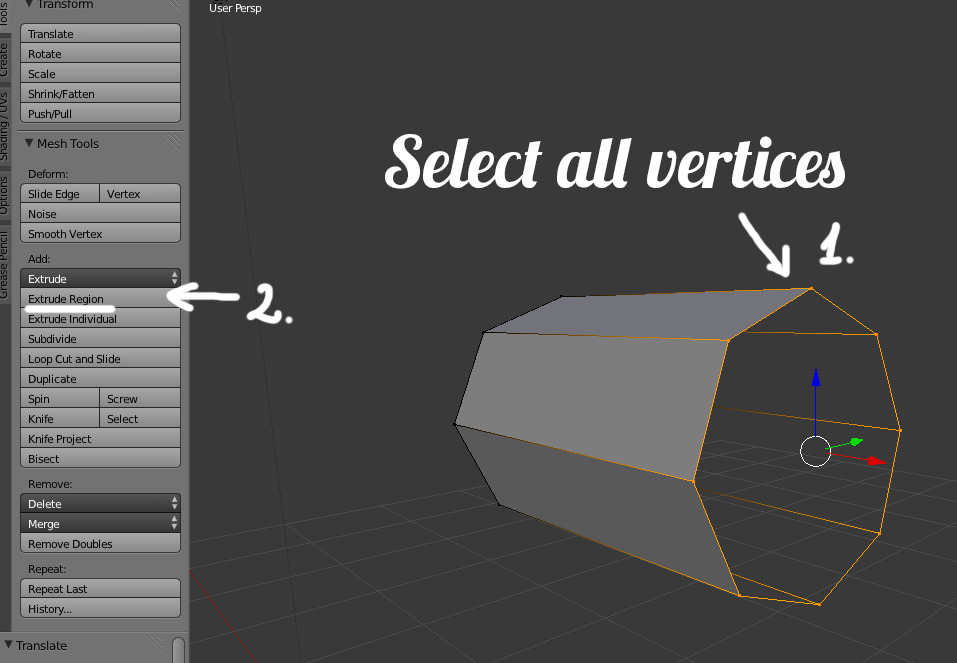
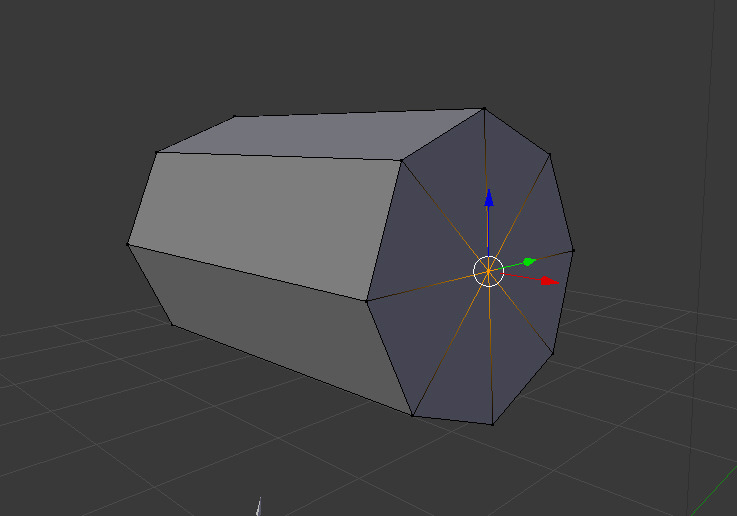
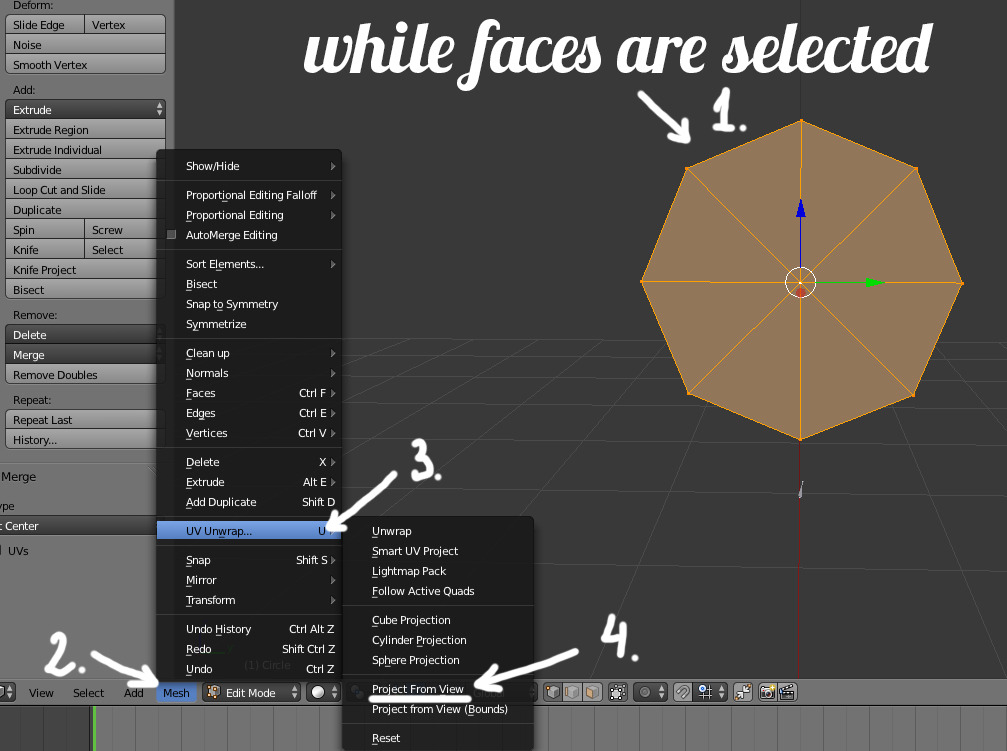
Here's one way. Select the faces (dots) of the part you want to close, then click "extrude region". After clicking "extrude region", click somewhere again so the faces don't move with your mouse.  Right away press Alt + M, this will bring the small Merge window on the screen, choose "At Center".  Now you just need to UVmap your newly created part. Select the faces, position your view so it's more or less straight on on the part, then click Mesh -> UV Unwrap -> Project From View.  That will create a neat little UV layout for you. |
|
|
|
Post by thefinespunfox on Apr 28, 2016 17:05:38 GMT -5
Okay, so, I closed both sleeves and UV mapped them, (thanks guys for making everything easy to follow!), but the texture still bleeds. I can't for the life of me fathom why at this point.
|
|
|
|
Post by MisterS on Apr 28, 2016 17:07:46 GMT -5
thefinespunfox re up the package, its probably something simple you are missing.
|
|
|
|
Post by thefinespunfox on Apr 28, 2016 19:17:07 GMT -5
|
|
|
|
Post by MisterS on Apr 28, 2016 20:12:06 GMT -5
This edge on the uv map is overlapping  You need to drag them down off the texture  If you need more info I can take more pics |
|
|
|
Post by thefinespunfox on Apr 29, 2016 5:43:09 GMT -5
Hey, it was simple! Once again, easy to follow, you guys rock, thank you so much! The shirt is fixed and I am so excited to release it. Seriously guys, thanks again, I learned so much. :3
|
|