|
|
Post by mauvemorn on Mar 16, 2020 1:22:53 GMT -5
You only need Blender 2.78.
As I understand, Keep single option ensures no vertex is unreferenced, that all of them have at least one vertex groups assigned, even if its value is below the limit. You can check it, but in my experience this never happened ( maybe if you forget to normalize/add Armature modifier when editing weights manually, but this is a mistake and should not be done). When you transfer weights, all areas get values, even if they are far away from the reference.
|
|
|
|
Post by pandacookiesims on Mar 16, 2020 1:51:15 GMT -5
ok. I'll try it again. Should I use a different reference mesh or does it not matter?
|
|
|
|
Post by pandacookiesims on Apr 13, 2020 1:29:55 GMT -5
You only need Blender 2.78. As I understand, Keep single option ensures no vertex is unreferenced, that all of them have at least one vertex groups assigned, even if its value is below the limit. You can check it, but in my experience this never happened ( maybe if you forget to normalize/add Armature modifier when editing weights manually, but this is a mistake and should not be done). When you transfer weights, all areas get values, even if they are far away from the reference. I took a break from working on the last item I asked for your help with, because I couldn't resolve the issue with morphing ( I was able to resolve the issue with transparency and the uv islands). I decided to mesh a more simplistic item that had a lower poly count. I used to following procedure (which I compiled from your tutorials and advice). 1. open nude top, append ref, and import OBJ 2. change uv map to uv_0 and uv_1 3. Data transfer - nearest face interpolated (left out close holes for simplicity) 4. removed double vertices 5. uv_1 mapping
6. delete faces inside mesh
7. Edge split and removed double vertices (select boundary loop, mark sharp edges, select similar - sharpness, mesh - edges - edge split)
8. weight transfer by name - all layers - replace, clean - all groups. All weight values were = 1 and none of the vertices had 0 value. 9. vertex paint: 00FF00 (set vertex colors, Press A twice, smooth vertex colors) 10. uv_0 mapping (select nude top, open base texture, view - draw other objects, shift select mesh, open base texture, place inside template) 11. bake textures 12. join mesh
Here is what my mesh looks like in game.
None of the morphing issues have been resolved. I am still not understanding what the source of the problem is. As far was I'm aware, I have followed the correct procedure. My weights and vertices have the correct values. This mesh is 6K polys which isn't excessive. I have many CC garments installed in my games and the items have polycounts at or above 15K and they render properly in game without morphs. Polycount can't be the sole source of the issue.
I haven't been able to retopolize the mesh to reduce polys because blender won't recognize the file source for the instant meshes remesh addon (that is a separate issue of course).
I would like your help in determining what steps I need to remedy in order to properly mesh my garments.
Let me know if you notice any procedural errors that I can fix.
Also, I have been having an issue with the amature modifier. One of your videos demonstrates how to use the amature modifier to move the rig and see if the clothes have any morphs, but I have been unable to amaturate it properly. The body moves through the mesh, when the mesh should be attached to the rig as it moves.
|
|
|
|
Post by mauvemorn on Apr 13, 2020 4:55:52 GMT -5
Hi again. The reason you get this problem is because you fit uvs in the uv_1 map in the uv space. They should not fit because deformer maps only come in halves. It's hard to see here, but the brightest area is the arm, in the right side of the image is the back, the front is in the left When in doubt, always compare to the maxis mesh. If you will look at the reference you used, you will see that it does not fit in the uv space. Regarding step 4 and step 7. Even if vertices share the same coordinates, they may get different vertex group values, which will lead to tiny gaps in mesh along split edges. We remove doubles on the garment before OR after Weight transfer to ensure that those vertices get the same values. We remove doubles on the body because we do not want s4s or ts4 to shade those split edges that go along the uv island seams as sharp. So step 4 is pointless in this case. We split the mesh to ensure that sharp edges are shaded as sharp in-game and do not cause dark shadows, because ts4 shades everything as smooth by default. We do this before importing the mesh in s4s or before baking textures. ( i find it more reasonable to first ensure that the mesh works right in-game and only after that to bake textures and make lods). If you want to mark all border edges ( along which the mesh is split from MD ), you should do it before removing doubles. If you want to only mark border edges around holes ( bottom, top, sleeves that we close ), you can just export the mesh as Weld from MD and Mark them before closing holes ( although it may lead to stretched uvs in the uv_1 map, depends on the density of the topology, so it's best to export the mesh as unweld) You do not need to split all edges marked as sharp, only those that would cause dark shadows. s4s splits the mesh along uv island borders when you import the blend in the package, but I find that it is not always enough. I prefer to manually split edges around closed holes. But again, you do that after you transfer weights. So step 7 makes no sense also. Since you did not close the holes, you do not need to mark or split anything at all, there are no sharp edges that would cause dark shadows (yet). Step 6. If you are transferring weights from the body, you obviously do not want to delete the hidden areas just yet. You can do this step right before editing uv_0. Step 8: " All weight values were = 1 and none of the vertices had 0 value" Not sure what do you mean by that. Value of 1 means a vertex is influenced only by one vertex group. 1 = 100%. If all vertex groups have this much effect on the vertex, some will get deleted and the remaining 4 will get auto normalized in a way that you do not want. But since the weights transferred right, I assume you just used wrong words.
Also, notice how your top is longer the the upper body mesh. When it's like that, you might want to use a full-body outfit to transfer the weights and remove extra ones with this addon Step 9. You only need to smooth vertex colors if there's more than one of them. If the place where one ends and another begins is not smoothed, there will be a gap in the mesh, even if it is not split. "I haven't been able to retopolize the mesh to reduce polys because blender won't recognize the file source for the instant meshes remesh addon (that is a separate issue of course)." This must be because the the addon only supports the latest version(s) of Blender. You can have as many versions as you want installed on your pc. But if you want to edit the item in the latest versions, append it in the scene, not open the blend. Well, you can actually just export it from Md, open Blender 2.83, import the obj file, retopologize, and just export it ( or save it and append in the scene in 2.78) "if the clothes have any morphs," Armature modifier is meant for rigging ( animation, weights), not morphing (uv_1 map, vertex paint). You cannot preview how the mesh will morph in Blender ( well, you probably can, but it requires greater understanding of .. a lot of things that I do not have, and it does not seem to work well, so it's easier to just check it in CAS, but if you do things right, you won't need to touch it at all) The reason the body moves while the garment does not is either because the garment does not have the weights assigned to it or because it has no rig selected/armature modifier added |
|
|
|
Post by pandacookiesims on Apr 14, 2020 0:28:22 GMT -5
Hi again. The reason you get this problem is because you fit uvs in the uv_1 map in the uv space. They should not fit because deformer maps only come in halves. It's hard to see here, but the brightest area is the arm, in the right side of the image is the back, the front is in the left When in doubt, always compare to the maxis mesh. If you will look at the reference you used, you will see that it does not fit in the uv space.
This is a summary I the changes I need to make based on what you've said:
1.) Use a different reference mesh, because my mesh is longer than the EA mesh.
2.) Correct how I do uv_1 mapping, because it is impacting the deformer map and causing morphing.
3.) My weights transferred properly so I do not need to change anything related to weight paint or vertex paint. 4.) Edge split and remove doubles only needs to be performed if I close holes and I need to split the uv islands (generally, I will close holes for my meshes). 5.) Smooth vertex colors only needs to be done if the garment is painted with multiple colors (E.I dresses that will have skirt bottoms painted 3FFF0 and everything else painted 00FF00). 6.) In order to retopolize, open the mesh in blender 2.83 use instant meshes remesh, export the mesh as obj, and import it into 2.78 for meshing into TS4. 7.) Make sure garment has rig selected for amature modifier to work properly (I used the wrong term accidentally. I meant to say weights, but put morphing). Do you have a tutorial that I can reference on how to do this step?
For clarification, are there any other changes I need to make? From the information you've shared, If I change uv_1 mapping that will resolve the morphing and my meshes will deform properly in CAS.
Thanks again for your assistance. Greatly appreciated. I hope you will check out my creations once I can properly mesh my garments.
|
|
|
|
Post by mauvemorn on Apr 14, 2020 8:14:22 GMT -5
4). yeah, closing holes, adding thickness, using any type of buckles. Those edges at 90 degrees or less ( sometimes more, depends ) case dark shadows unless split. 7). step 1-8, 22-26Yeah, everything you need to change I mentioned. Now you just select the uvs in the uv_1, select everything with A, S X 2 for it to return to its initial size, then put it back with G X -512* ( 512 is half of the width of the background image in pixels) |
|
|
|
Post by pandacookiesims on Apr 15, 2020 21:46:19 GMT -5
4). yeah, closing holes, adding thickness, using any type of buckles. Those edges at 90 degrees or less ( sometimes more, depends ) case dark shadows unless split. 7). step 1-8, 22-26Yeah, everything you need to change I mentioned. Now you just select the uvs in the uv_1, select everything with A, S X 2 for it to return to its initial size, then put it back with G X -512* ( 512 is half of the width of the background image in pixels) I made the correction and the mesh rendered properly without morphing. There is one small problem still. When checking the mesh in CAS, the color of my texture is "bleeding" along the seams.
 front  back
The back of the texture is fine, but the front is not clean. Do you know what is causing this? The baked texture seems to have rough edges. I'm currently using gimp 2.10 with layer effects add-on to edit my texture map.
|
|
|
|
Post by mauvemorn on Apr 16, 2020 14:23:41 GMT -5
This is a good example of why unnecessary dense topology is a bad thing  Breast size is regulated not only by a uv_1 map but also b__CAS_R_Breast__ and b__CAS_L_Breast__ vertex groups. There is one way you can resolve it without changing topology, but I usually avoid suggesting it because it can cause more issues if you're not careful: 1). Never use it on the body. Either separate the garment or just select it only; 2). Each vertex can be influenced by no more than 4 vertex groups, the rest will be deleted by s4s during import. Use Limit total to remove the right ones ( with the lowest values) after every time you use Smooth tool; 3). Some vertex groups ( armpits, sometimes knees and elbows ) should not fade smoothly, it will affect animation. It is best to either avoid using this tool on these areas of clothing or adjust them individually afterward; 4). It can spread the paint too far, be very careful with it. You can use Clean tool and change Limit to, say, 0,05. Anyway - Make sure the mesh has Armarture modifier and rig selected. This insures that weights auto normilize when you edit them in Weight paint; - In Edit Mode disable Limit selection to visible. Holding Ctrl, LMB-click-and-drag to select the garment partly, then press Ctrl L to select the rest; - Switch to Weight paint and enable Vertex selection masking for painting; - adjust the settings, if you need it to expand less or more, adjust Expand/Contract; - use Limit total with Limit set to 4 and Subset to All groups; - if it won't work, select each breast vertex groups and use Smooth tool with more Expand and Subset set to Active group. Don't forget to use Limit total again; - since you adjusted weights on the mesh with split edges, don't forget to remove doubles to make sure that vertices that share coordinates also have the same vertex group values.
 While we're at it, you put that geometry you created to close a hole at the bottom in the space meant for shoes and bottom. Also, everything that does not need to be of good quality can be scaled down to not take up space. Things that could use extra definition ( buttons, zipper, etc) can be scaled up  |
|
|
|
Post by pandacookiesims on Apr 17, 2020 4:29:26 GMT -5
mauvemorn Thanks. I'll let you know the results when I try these steps. I have one more question. I want to know how to edit the texture map so the us islands have a nice outline and it creates the appearance of seam on garment. I noticed for the Jill Sanders dress you made, each piece on the texture map has a dark outline and the garment has nice definition along the seams. I attempted to do the same this by using layer effects. I added a stroke to the uv island pieces to create an online. However, it isn't clean, but rough and uneven. The seams look sloppy in S4S.Can you show me a better way to make a smooth outline? Or Do I need to bake the texture map differently? texture map 
|
|
|
|
Post by mauvemorn on Apr 17, 2020 6:50:22 GMT -5
This outline is created automatically. You can increase Margin ( 15 ) to something like 3-5 pixels maybe ( just make sure that they do not overlap with the body's uvs), you do not want to place your garment's uvs too close to each other and the body) during baking 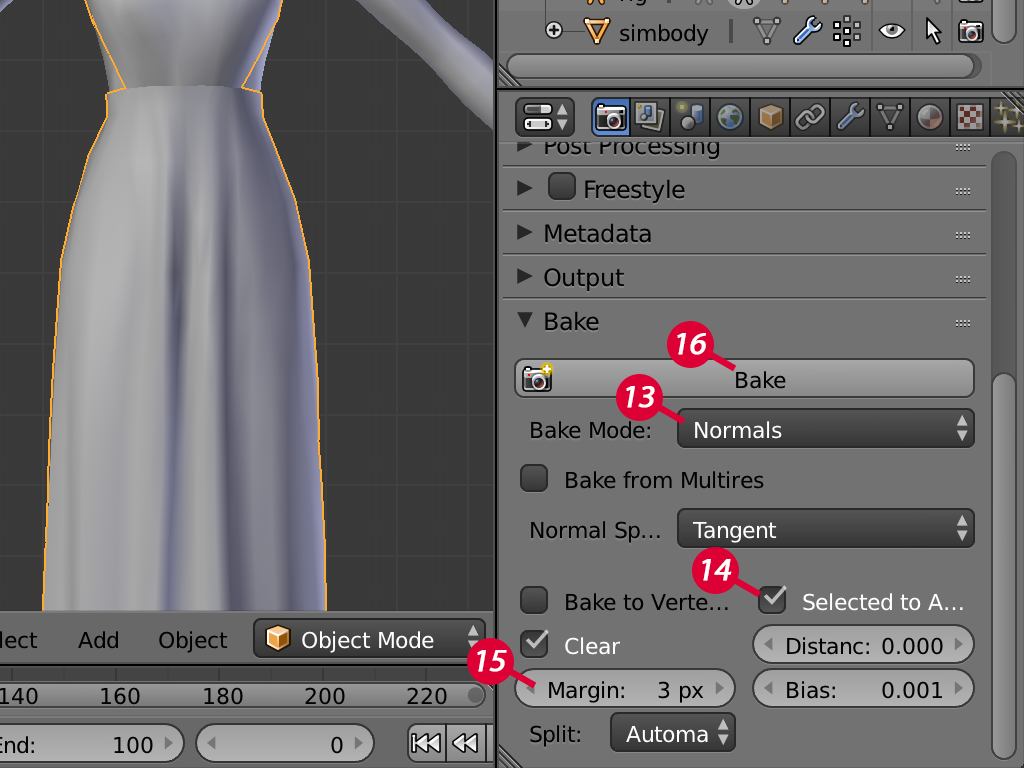 The purpose of it is actually not to create a seam on the clothing but to ensure that, when the texture compresses*, the transparent gaps in the clothing do not appear When you zoom out, the game changes LODs ( level of details )and compresses textures. So you always want to have a few extra pixels around uv borders to make sure that when texture compresses these borders won't become blank. Here's what i mean, in the game it is more pronounce if you're playing on the lowest settings  |
|


