|
|
Post by pandacookiesims on Feb 27, 2020 16:46:32 GMT -5
I created an outfit in CLO3D version 5.1.482 (newest version). The outfit has portions made of transparent mesh fabric. I exported my obj with with all the meta data and texture files as specified by CLO's OBJ export guidelines. In blender, the mesh transparency renders properly, however, in game my outfit doesn't show transparency. It just shows up as a blob.
 |
|
|
|
Post by mauvemorn on Feb 29, 2020 9:25:45 GMT -5
Hi. First thing first, I sugest you to either retopologize the mesh or at least lower the density. Very high polycount will slow down the loading process both in CAS and s4s. The mesh with dense topology will morph and animate in the "crumpled paper way". About your issue.The hole's uvs are in the wrong place. It gets its texture from the side of the body. Put it in the right place in the chest area  |
|
|
|
Post by pandacookiesims on Feb 29, 2020 22:22:17 GMT -5
Hi. First thing first, I sugest you to either retopologize the mesh or at least lower the density. Very high polycount will slow down the loading process both in CAS and s4s. The mesh with dense topology will morph and animate in the "crumpled paper way". About your issue.The hole's uvs are in the wrong place. It gets its texture from the side of the body. Put it in the right place in the chest area Thanks. So anytime an internal shape is used in a mesh, the cutout portions needs to overlap with the shape itself. Does the same principle apply if you have mesh with portions that have been "hidden" in CLO's 3D view? |
|
|
|
Post by mauvemorn on Mar 1, 2020 1:40:19 GMT -5
No, this is not what I meant. There are three types of transparency in The Sims 4:
- achieved through alpha channel/opacity altering. It does not make the mesh see-through, only the textures. Basically it just makes the skin texture underneath more visible and the diffuse texture of your garment less visible, which is what you are seeing on your first pic;
- achieved through glass Shader. Basically it's the same thing, but it actually makes the mesh transparent. This shader exists specifically for the glass part of glasses, but we use it for alpha hair and other things;
- the proper type of transparency that is achieved through altering of alpha channel/opacity but actually makes the mesh transparent as well. Only available for objects. I assume there is a way of somehow tuning CAS items to have this type of shader but have no idea how and am yet to see anyone do this.
Anyway, you are trying to achieve transparency with the first method. And you are achieving it, but the uv island of that transparent part is in the wrong place. You are seeing the side of the body instead of the cleavage because that's where the uv island is
|
|
|
|
Post by pandacookiesims on Mar 1, 2020 3:03:53 GMT -5
I set the particle distant to 20 to lower the poly count. I placed the uv island for the transparent mesh piece over the internal shape. I currently have alpha channel/opacity set to 0.25. The transparency looks better, however something seems off. I imagine it's difficult to get meshes to have transparency similar to EA meshes. Here are the updated files. packageblend files |
|
|
|
Post by mauvemorn on Mar 1, 2020 6:13:19 GMT -5
It should be bigger. The bigger your uvs the better the texture quality. The garment is not vertex painted the right way. Also, you started a package from something that has no skirt vertex groups but transferred the weights from something that does have them. When this done, you or people using your cc might get this distortion Anyway, I scaled the uvs, edited vertex paint, edited weights ( the body itself had messed up weights, never join the body with the garment until it is done), edited uv_1, re-started a package from the item that has skirt vertex groups new blend and package files |
|
|
|
Post by pandacookiesims on Mar 1, 2020 16:42:12 GMT -5
Do I need to change how I join my nude mesh parts to made the nude body? And I want to express my gratitude for your help. I want to learn proper procedures for meshing items, but most creators use shortcuts and aren't thorough with explanations. I appreciate that you spend a lot of time answering my questions in great detail.
I also have 1 more follow up question. I noticed that when I'm meshing in blender, sometimes the nude base will come through mesh causing holes and such. To remedy this, I usual go into sculpt mode and move the mesh around. Is that the result of how the polys subdivide or something else? Here is my current blend file.
I have performed hole close, data transfer, weight paint, and vertex paint. I having the following issues: 1. I did a hole closure for the bottom of the skirt. But the skirt hem seems to still be connected to the new uv island. I can't arrange my uvs on the base texture template after deleting the faces because of this new issue. I did the data transfer, weight paint, and vertex paint steps without joining the mesh to the nude body as you specified. I hope those turned out fine.
|
|
|
|
Post by mauvemorn on Mar 2, 2020 5:38:35 GMT -5
You do not need to change anything, just do not join the body with the garment until it is done.You can also find a whole body in the full-body category by typing lingerie or swimsuit
Unwrapping does not actually split the mesh along seams, only the uvs. So when you select edges or vertices that are on the uv island borders with the sync on, they are selected on all uv islands. You can deal with it in 3 ways: - i like to select things in Vertex select and then switch to Face select. This would be the best in your case; - disable sync and turn off sticky selection. If you want to edit vertices or edges on the borders individually, just do that. Unnecessary in your case, but can be useful in others; Sync is circled, Sticky selection is that icon with 3 dots in the square frame, select the second option
- split the mesh. For example, if you select and split that border edge loop, the vertices at the bottom of the skirt will not be selected because they are no longer joined. However, do not split the mesh in any way before transferring or editing weights. Even if vertices share the same coordinates, they might get different vertex group values and cause gaps to appear. About nude base, your garment is very high poly while the body underneath is low poly.
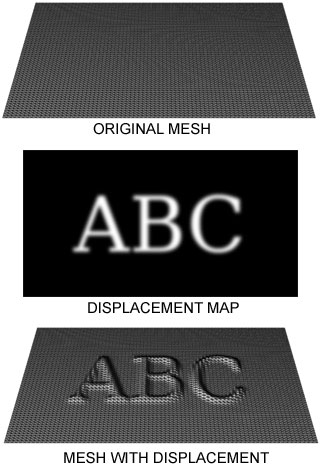
When you transfer the weights from low poly objects to high poly, the result is not very smooth. In uv_1 map's case, it's sort of the opposite. Both low poly and high poly meshes will deform according to the same deformer map. Those deformer maps work sort of by the same principle displacement maps do.
In displacement map's case, the whitest area would be the most protruding while the darkest the most depressed.
Displacement maps are usually used to create terrains ( by converting an existing image into black and white map and linking it to the surface ) or by baking small details from the high poly mesh to the low poly mesh to save render time ( wrinkles, seams, things that only need to be visible during rendering ). So as I understand deformer maps used for morphing ( sliders, gender, age, body weights, etc ) were created somewhat similar. Developers must have duplicated the original mesh and changed its shape, then baked this difference into image. So every time the mesh needs to morph, it uses this color information as a guide, I think. This is an example of what some muscle altering deformer map looks like (only one half of the body, they are mirrored)
Anyway, if two meshes with different polygonal density have to morph according the same deformer map, they will do it differently because their vertices are in the different places on the uv_1 map and in space So yeah, this is why you have the body poking out from the garment. This is also one of the reasons why you should not make high poly meshes Also, the mesh is vertex painted by the wrong color. 00ff00 - skin-tight variation of deformer maps; 3fff00 - robe-like variation of deformer maps meant for skirt-like bottoms and between breast
Vertex paint dictates what variation (skin-tight and robe-like) of deformation maps the painted area will deform according to in CAS during body customization and animation. 00FF00 is for skint-tight areas, 3FFF00 is for any skirt-like area ( skirts, bottom parts of dresses, coats, aprons, etc). Start by choosing 00FF00 and Paint - Set vertex color 1). Disable Limit selection to visible; 2). Holding Ctrl, lasso-select the bottom part of the mesh starting somewhere in the middle of the pelvic bone; 3). Enable sync; 4). Press B and deselect legs; 5). Switch to Vertex paint and enable Face selection masking for painting; 6). Type in 3FFF00; 7). Paint - Set vertex colors; 8). Press A twice to deselect and select everything again, Paint - Smooth vertex colors  |
|
|
|
Post by pandacookiesims on Mar 2, 2020 16:25:13 GMT -5
Thanks. This is a concise explanation. I have follow up questions. For clarification, hex code 3FFF00 is used to vertex paint lower regions of a garment, starting from the pelvis. 00FF00 is for upper regions including torso, arms, and neck? Is this the order I should use: 1. open nude base, append reference mesh, and import mesh. 2. change uv maps (uv_0, uv_1) 3. data transfer 4. weight paint 6. vertex paint 7. close holes and split mesh 8. bake maps 9. remove faces from inside nude base 10. join mesh to base Also, are you aware of additional methods for reducing polycount that are free? I can't afford zbrush, I realize MD has a remesh beta feature, but I prefer to stick with CLO which has student discount, and blender's decimate modifier works well for some meshes, but causes issues along seam lines for more complex meshes.
So I don't need a nude full body base just export a full body base from lingerie or swimsuit category?
|
|
|
|
Post by mauvemorn on Mar 2, 2020 17:10:54 GMT -5
00ff00 is for everything other than accessories, hair, mermaid tails and skirt-like bottoms. 3fff00 is only for skirt-like bottoms and the area between breasts ( i usually only paint the skirt part) 1). There are body parts under rig you can duplicate and use as a nude body, but yeah; 2). You should close holes and add thickness right away so that those areas get proper weights and uvs in the uv_1 map; 3). Uv_1 mapping is best when the mesh is split along those seams that are close to the seam on the body; 4). Weight transfer is best when doubles are removed, vertices may get different vertex group values even if their coordinates are identical; 5). Vertex paint is best when doubles are removed as well, just in case you have a split edge loop where the gradient should be; 6). Remove hidden body parts before placing uvs in the uv_0 map; All CAS items share the same UV space. Each has its designated area. To avoid overlapping, make sure to place UV islands not only in their designated areas but also in the vacant space. 1). Select the body, switch to Edit mode ( TAB ), disable Limit selection to visible; 2). Select everything covered by the garment, press Delete and choose Faces. If the garment has skirt-like bottom, make sure to leave at least one row of faces. Otherwise these deleted areas will be visible during walking; 3). Enable Sync, select everything with A; 4). Click on Browse and choose any texture; 5). Shift-select the garment, select everything, choose THE SAME texture, check View - Draw other objects. 6). G to move, S to scale, R to rotate. Following the first two with X/Y will constraint transformation to horizontal/vertical axis. Following any with a number will move/rotate the selection by that number of pixels/degrees. By default UV space is square ( 1:1 ), but TS4 textures are not ( 2:1 ). UV islands that were generated in the square space will become stretched vertically when rectangular textures are applied. To bring them back to their original size, select everything in UV Editor, press G Y 0.5 Place the garment's UV islands in the right spot. Make sure to scale them uniformly unless some need extra definition ( buttons, zipper, other small details ) or are hidden ( geometry created to cover holes, back side of clothing, etc ).  7). S4S splits the mesh along uv island borders which removes those dark shadow but does not shade them as Sharp, so if your uvs in the uv_0 are split in along sharp edges, you don't really need to split them manually in 3d view. You can though to avoid those dark shadows being baked into textures ( or you can mark it as sharp and adjust Auto smooth); First image - split mesh;
Second image - split uvs, mesh is not split. 8). I suggest you to check the mesh in cas first and only then bake textures. So you can join the body with the garment, set type and cut number, Save as and import it in s4s; 9). If happy with what you got, bake textures and make LODs In new version of MD they have this new topology tool that allows you to just straight up draw how you want edges to flow, so that's cool, but Blender has similar feature called Bsurface, you can look it up on youtube. There is a free tool for automatic retopology called Instant meshes. It was bad but now they introduced a Blender addon, don't know if it's good though. |
|
|
|
Post by pandacookiesims on Mar 3, 2020 10:57:08 GMT -5
All of your information is always so helpful.
So does this order seem fine?
1. open base, append ref, and import mesh
2. change uv maps: uv_0, uv_1
3. close holes (don't split mesh yet)
4. clean up vertices (remove doubles, etc)
5. data transfer
6. UV_1 mapping (Andrew's template)
7. delete faces inside body (don't join)
8. UV_0 mapping (base texture)
9. weight transfer
10. split mesh
11. vertex paint
12. bake textures
13. join mesh and export
Thanks. The instant mesh add on for blender looks great. I believe you mentioned once that meshes shouldn't exceed 15K polys (I imagine this is for full body garments). Just tops or bottoms probably shouldn't exceed 5K polys as most EA meshes are around 3.5K or 4.5K polys.
|
|
|
|
Post by mauvemorn on Mar 3, 2020 11:03:57 GMT -5
Switch 4 and 5
You do not really need Andrew's template anymore since we are not making a uv_1 map from scratch anymore
9). Remove doubles, weight transfer
10). Vertex paint
11). Split mesh
12). Bake textures
Yeah, it's just that if each item is 15k+, the whole look might take time to load and render.
|
|
|
|
Post by pandacookiesims on Mar 14, 2020 18:58:03 GMT -5
Switch 4 and 5 You do not really need Andrew's template anymore since we are not making a uv_1 map from scratch anymore 9). Remove doubles, weight transfer 10). Vertex paint 11). Split mesh 12). Bake textures Yeah, it's just that if each item is 15k+, the whole look might take time to load and render. I have a new issue. The mesh is floating off of the sim body. I imagine is has something to do with the weights.  package fileblend file package fileblend file |
|
|
|
Post by mauvemorn on Mar 15, 2020 3:01:07 GMT -5
Need access to download the files, but in latest versions of Blender you must take an extra step when transferring weights: 1). Select the reference, Shift-select your dress, switch to Weight paint, click on Transfer Weights, choose By Name; 4). Click on Clean, select All groups;  |
|
|
|
Post by pandacookiesims on Mar 15, 2020 20:51:13 GMT -5
Here are the new files. blend filepackage fileThe steps I did were slightly different because I was following this tutorialSo I don't need to check the box keep single?
Also, do I need to switch to blender 2.81 because I'm using 2.78?
|
|