|
|
Post by Omorfi-Mera on May 6, 2015 12:36:16 GMT -5
Hello, creators! We're trying to tame the influx of duplicate help threads and also help people find great threads going over tricks for special projects. Below is a list of common problems (and possible solutions) and an index of helpful threads detailing how to deal with certain advanced projects. If you still need help with your project, do not hesitate to make a post. Please take a moment to read orangemittens 's Creator Help FAQ thread. 1. General Problems2. CAS Problems3. Build/Buy Problems4. Troubleshooting Texture Issues For Objects
5. INDEX of Helpful Threads for Special Projects: CAS/Pose and Build/Buy/Tuning ~~~ Some helpful links:

General Problems:1. S4S isn't showing anything/It can't find my game [Example]- Unzip with 7zip or use the installer
- Make sure your game path is correct. It should contain the folders shown
- C:/Program Files (x86)/Origin Games/The Sims 4
- See this thread for possible solutions
2. S4S isn't showing objectsObjects are currently unavailable for the Mac version. Objects can now be edited in the Mac version.
GLHF!  |
|
|
|
Post by j on Aug 2, 2015 9:55:35 GMT -5
CAS Problems:1. Object is too shiny [Example]- Specular is normally responsible for the shine. Even if the specular was done correctly, the creator may have attached an incorrect specular mask.
- See this S4S tutorial to familiarize yourself with speculars
- If your shine has a yellow/blue/green hue, it may also be a bump map problem (missing alpha or incorrect size), see this S4S tutorial to familiarize yourself with bump maps
2. New object displaying remnants of old object [Example]- You might be seeing the original bump map/specular over the new texture
- See this S4S post
- Important - Make sure you smooth out the alpha channel as well!
3. Getting rid of the seam line [Example]- At first glance it might look like the texture isn’t lined up correctly but often times it’s because you have overlapping vertices. All you need to do is remove doubles
- See this picture for reference (Make sure you’re in edit mode and have your object selected)
- See this blender tutorial (I leave the “merged distance” alone)
4. CC looks different/distorted when zoomed out- You need to make sure that ALL of the LODs under the "Mesh" tab in S4S have been replaced
- See this photo for reference (All 6 of these slots need to be replaced).
5. Editing old shadows [Example]6. Need to recategorize my object- You can move things around under S4S’s “tag” tab
- See this photo for reference. Doesn't get any easier than that!
7. Parts of my sim's body are white/black [Example]- Incorrect alpha or missing alpha
- Correct compression format is dxt5 argb 8bpp | interpolated alpha
8. Texture is showing up nude in the game [Example]- Make sure your .dds is the correct size and have mip-maps checked
- Your textures must retain the multiple of 2 ratio, so this means your textures can be 256 x 512, 512 x 1024, etc.
9. Object/parts of object not showing up in the game [Example]- Could be a variety of things. Check the cut number, or make sure you have assigned bones correctly
10. How do I recolour CC without including the mesh as per original creator's wishes?
- "Create CAS Standalone" option does not copy mesh data, therefore your recolour would require the original mesh to work in the game. See this S4S tutorial.
11. I recoloured someone else's CC but in the game there is no thumbnail and the item is invisible/sim is missing body parts
- You need to have the original mesh in the game for the recolours to work because S4S does not carry over mesh data when you recolour a piece of CC
12. My recolours are overwriting the original item- You need to clone the item you want to create standalone recolours for, including existing CC
- If you open up the item through "My Projects", you will be editing the original. See this S4S tutorial
13. Rainbow/question mark texture on my object [Example]- The game doesn't recognize the texture
- This can be caused by a missing spec/bump, wrong texture size, or an unwanted alpha
14. Why am I seeing default brows/bra straps/underwear in S4S under my mesh?- That is the default texture on the model, they will be gone in the game (brujah created a set of replacement skins here)
15. Why am I seeing clothing in the nude state?- The original creator carelessly/accidentally enabled the garment for Nude
- You could ask them to fix it, or you could fix it for your personal use with the help of recategorization. See question 6
- If you have correctly tagged the item and it is still showing up as a default garment or when the Sim is supposed to be nude make sure that all swatches have the DefaultForBodyType box in the CASPart unchecked:
 16. Unwanted CC showing up for aliens17. Bottom of my garment is covered by a shadow [Example] 16. Unwanted CC showing up for aliens17. Bottom of my garment is covered by a shadow [Example]- When "Remove Doubles" action is taken, parts of your mesh may become extra "glossy". You can fix this by splitting edges on the affected area(s). See this S4S tutorial
18. Texture of the bottom garment is overriding the top [Example]- You may need to change the "sort layer". This is done through the warehouse on each "CAS part". See this S4S thread
19. Imported a new thumbnail but the game is still showing the old/default- Clear the thumb cache (localthumbcache located in the TS4 folder)
20. Need help with alpha hair21. Adding transparency to clothing
- Can't import the second meshgroup - add new geometry to LODs in CAS Part first, then re-import the blend file ( step 5 );
- Rendering issue in-game ( triangles ) - need to layer the mesh;
- The transparent meshgroup displays skin texture instead of being see-through - move the meshgroup's UVs in the extra space in the bottom-right corner, away from the body UVs. Use this template as a guide.
GLHF! 
|
|
|
|
Post by j on Aug 2, 2015 9:55:47 GMT -5
Build/Buy Problems:1. Object is too shiny [Example]- Specular is normally responsible for the shine.
- See this S4S tutorial on how to reduce the shine on your object
- It can also be due to the removal of normals in Blender. You can split edges manually, or use the Split Edge modifier to de-smooth your mesh.
2. New object displaying remnants of old object [Example]- You might be seeing the original bump map/specular over the new texture
- See this S4S post
- Important - Make sure you smooth out the alpha channel as well!
3. Getting rid of the seam line [Example]- This may appear as a high contrast in light between two adjoining parts of your mesh. See THIS POST to fix it.
- At first glance it might look like the texture isn’t lined up correctly but often times it’s because you have overlapping vertices. All you need to do is remove doubles
- See this picture for reference (Make sure you’re in edit mode and have your object selected)
- See this blender tutorial (I leave the “merged distance” alone)
4. CC looks different when zoomed out and/or original shadow visible when object is outside- You need to make sure that ALL of the LODs under the "Mesh" tab in S4S have been replaced.
- See this photo for reference (All 6 of these slots need to be replaced)
- If your LODs are correct, it can also be an incorrect texture size, or an unneeded alpha. You need to stick to sizes 128, 256, 512 and so on, and should not include an alpha if your object does not use transparency. Make sure your texture is .png or as a .dds DXT1
5. CC is career locked6. Unwanted texture around object (transparency issue) [Example]- When working on an object that has a transparent element to it, you need to make sure that the cloned object also has some transparency. Plants will always have this but any object with some transparency can be cloned.
- You can tell if an object is going to have or need transparency by opening it up in S4S and taking a peek at the texture [example].
- The more detailed the object, the more likely it will have some transparency to it.
7. Editing old shadows [Example]- See this S4S tutorial.
- If not, check out this video (from this S4S post) - I use this as a last resort because it will remove the shadow completely
8. Need to recategorize my object.- You can move things around under S4S’s “tag” tab
- See this photo for reference. Doesn't get any easier than that!
9. How do I recolour CC without including the mesh as per original creator's wishes?- "Standalone Recolor" option does not copy mesh data, therefore your recolour would require the original mesh to work in the game. See this S4S tutorial (it uses a CAS item as an example, but the process is the same)
10. My recolours are overwriting the original item- You need to clone the item you want to create standalone recolours for, including existing CC.
- If you open up the item through "My Projects", you will be editing the original. See this S4S tutorial.
11. Rainbow/question mark texture on my object [Example] - The game doesn't recognize the texture.
- This can be caused by a missing spec/bump, wrong texture size, or an unwanted alpha.
- This problem can be fixed by resizing your diffuse image (the main texture image) so that it has sides that are 64, 128, 256, 512, or 1024. The image can be rectangular or square, but each side needs to be one of those numbers. If your diffuse image is already sized correctly, make sure you have not removed a necessary image or included an alpha image where an alpha is not needed.
12. Imported a new thumbnail but the game is still showing the old/default- Clear the thumb cache (localthumbcache located in the TS4 folder)
13. Object has a gloss/faint yellow-ish glow about it and I'm certain it's not the specular/bump map- When "Remove Doubles" action is taken, parts of your mesh may become extra "glossy". You can fix this by splitting edges on the affected area(s). See this S4S tutorial
14. Object casts an unwanted shadow on the wall when placed- The shadow is caused by the occluders in the Light resource. Click into the Warehouse, click the Light resource line, click the Edit Items button in the Occluders section, and when the Edit Occluders box pops up click the Clear button in the lower part of the left side box. Then save the .package.
15. I cloned off of a Debug object, it's not showing up in the Buy Menu16. My object mesh looks odd in Blender (see picture)- The picture shows a table whose legs have the faces facing inward instead of outward. To fix this select all the vertices of the legs in Edit Mode, click the space bar on your keyboard, type Flip Normals into the selection popup box, click Flip Normals on the list. Example picture of flipped normals:

GLHF! 
|
|
|
|
Post by Omorfi-Mera on Aug 4, 2015 17:16:17 GMT -5
Troubleshooting Texture Issues For ObjectsTexture problems can manifest in many different ways. What you see on your screen could be different from what I see. Some people will get question marks on their objects while others, like me, will get a random EA texture instead. It could also look like your texture is shifting when you move your camera around or view it from a distance. Usually, you won’t notice the problem unless you’re playing with lower settings so I highly recommend testing your object in laptop mode before sharing. 1. Correct Bump and Specular Maps
- Never delete your bump or specular map. If you need to replace it, you can (a) export the map to edit and then import it back in, or (b) import a new one.
- Make sure you edit your alpha layer as well. If you still see a shine even though your specular map looks black – you need to check the alpha channel of your spec map to make sure that it is also black.
- Save your bump and spec as a DXT5-Interpolated alpha. This will ensure that your alpha channel remains intact. See this S4S post for more information: sims4studio.com/thread/1079/get-eas-bump-specular-maps
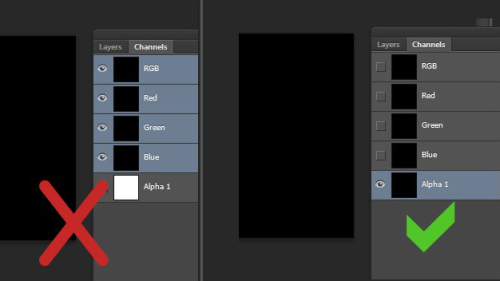 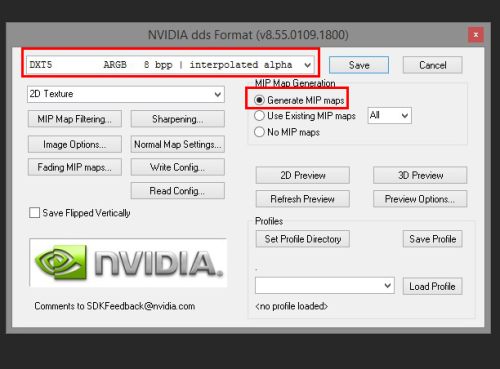 2. Saving as a dxt1-no alpha v. a dxt5-interpolated alpha 2. Saving as a dxt1-no alpha v. a dxt5-interpolated alpha
- Dxt1- No alpha should be used for objects that have no transparency.
If you don’t – you might get glitches like the one below. - Dxt5 - Interpolated alpha should be used for objects that require transparency.
If you don’t – your object will not correctly display glass or invisible parts. - If you’re using the latest version of studio, you can just save as a .png. Note that if you are saving as a .png, and the item is not supposed to have transparency, you need to create a new layer under your image and completely fill that layer so that there is no part of the image that is uncovered by texture. If you do not do this your .png will be saved with transparency and it will look wrong in the game. Conversely, if your .png does require transparency you need to be sure that some small part of the image is not covered by texture or else it will be saved without transparency and it will look wrong in the game.
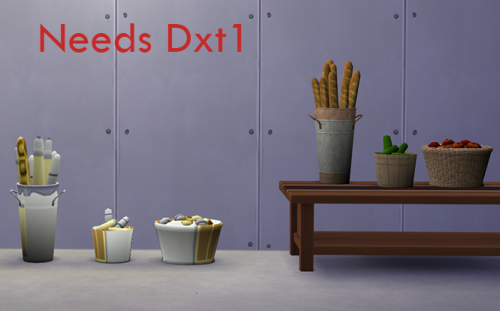 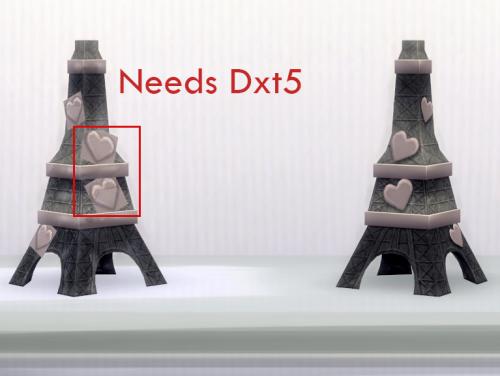 3. Texture size MUST be saved in powers of 2 (2n) 3. Texture size MUST be saved in powers of 2 (2n)
- Ex: 64px, 128px, 256px, 512px, and 1024px
- It can either be a square or rectangle but it has to use the numbers listed above.
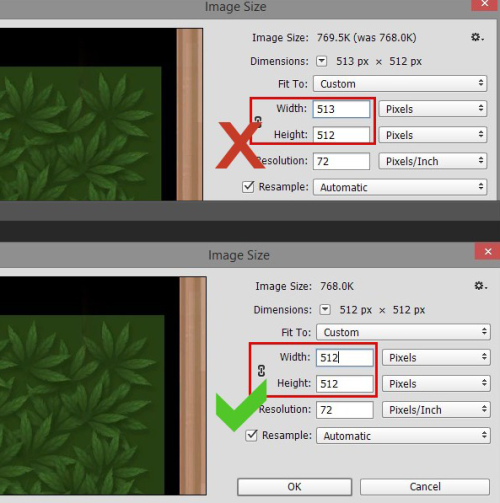 4. Using the correct UV map 4. Using the correct UV map - Make sure your Map fits the texture!
- You can view your texture in blender by going into edit mode - Select All (hit a) - and browse images
- If you don’t see your texture, go into the image tab - open image.
- Tip: Use the UV selection sync to view your entire map at all times while in edit mode. This should make it easier to edit your map
- You want to make sure that you allow for some space around your uv islands.
- Make sure you only have one uv map.
- This is important for people who frankenmesh.
- When you append a mesh, it will bring over all of its properties including the uv map. In order for your newly joined mesh to properly share the same texture, you need to make sure that all the uv maps have the same name BEFORE you join. If you don’t, blender will keep the maps even after the meshes are joined. This can cause the game to read the wrong map.
- If you find yourself with more than one uv map, you can simply remove the ones that you don’t want.
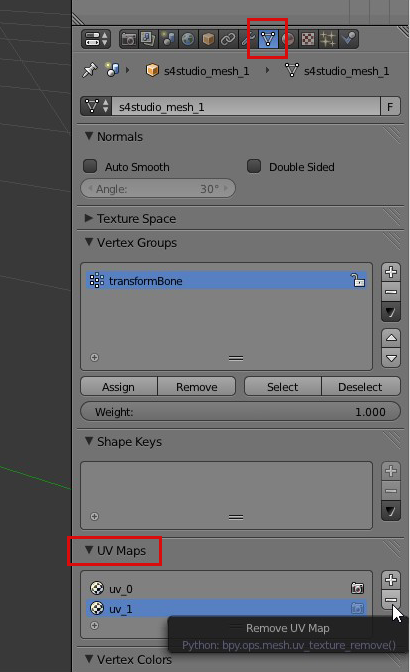
|
|
|
|
Post by orangemittens on Jan 9, 2017 14:49:10 GMT -5
|
|


