|
|
Post by Leniad on Dec 8, 2019 11:42:12 GMT -5
I haven't done much with CAS meshes, so this is pretty new to me. I found a beaver hat, like Buckingham Palace guards wear, but game wouldn't recognize it. It appeared fine in S4S. I exported the beaver hat mesh, created a CAS Standalone EA cap, exported cap mesh, opened beaver hat mesh in blender and exported to .obj file, opened cap mesh, imported beaver hat .obj, joined the meshes, deleted the cap vertices, adjusted the hat in the right place, saved the mesh, imported back into the CAS Standalone EA cap and all seems good. When I put in game the hat wobbles around on head. I couldn't find a tutorial on hats, but followed OM's tutorial on earring accessory. I 'think' I reset the rig correctly, but obviously something is wrong. The blend file and object are in zip file HERE if someone can help me figure it out. Thanks in advance. |
|
|
|
Post by Feyona on Dec 9, 2019 3:52:55 GMT -5
I can see it in the game. It is just assigned to the wrong bone. Your mesh looks a bit different from the one that is extracted from Studio. Yours doesn't have proper vertex paint and has UVmap, uv_0 and uv_1. I suggest extracting LOD0 from Studio, and re-assigning it to the head bone. Right now it is assigned to the thigh bone.
|
|
|
|
Post by Leniad on Dec 9, 2019 12:34:27 GMT -5
Thanks Feyona I started again as suggested but still same results.  It looks like I assigned to head, but maybe that isn't the best one or I did it wrong.  Renamed and posted files HERE if you can see where I am going wrong |
|
|
|
Post by Feyona on Dec 9, 2019 17:02:01 GMT -5
Your new .blend has no bone assignment, no vertex paint and improper uv map name. I guess Studio corrects them when you import the file. When you select a vertice it doesn't show any bone weight which means that there is no bone assignment. When you import it in Studio program assigns it automatically to one of the bones in main .package. In this case it chose thigh bone. You need to do following changes in your .blend: 1. Delete uv_0 and uv_1, rename UVmap to uv_0. 2. Vertex paint your hat (check EA's mesh for correct color of vertex paint, use color picker to pick correct color in wirewrame mode) 3. In edit mode select all vertices, click on b__Head__ bone, and click "assign". On the picture blue color shows not assigned weights and red shows vertices after a selected them and clicked "assign". They turn red. 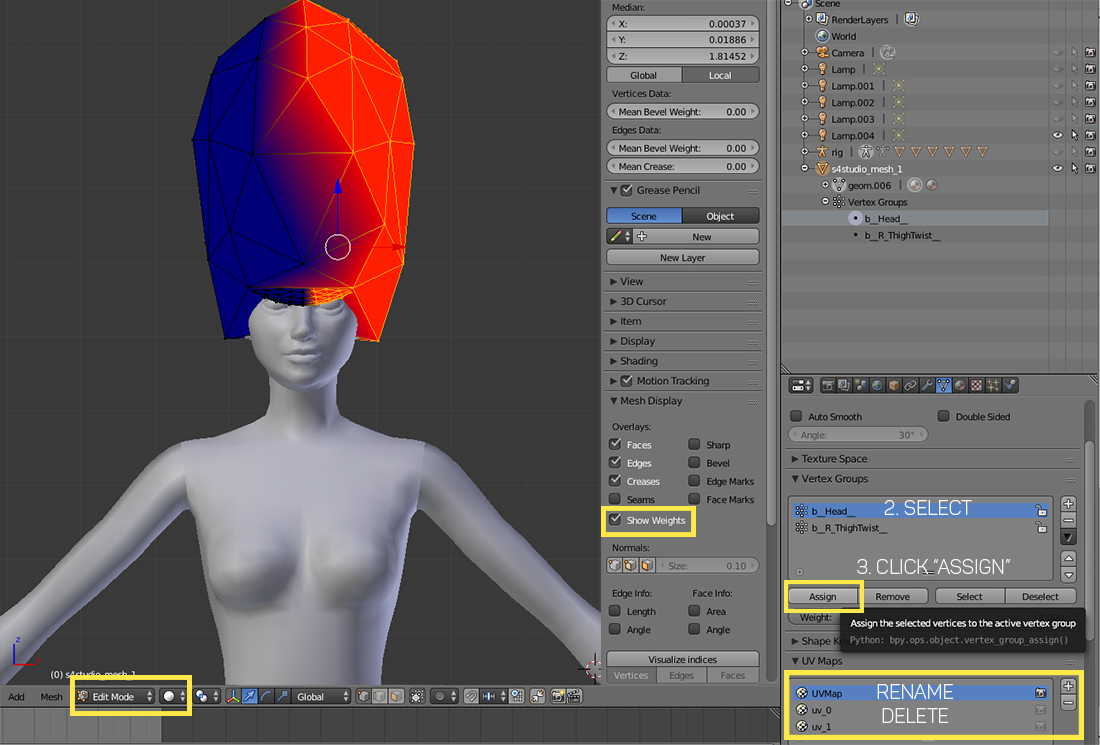 |
|
|
|
Post by Leniad on Dec 9, 2019 18:04:11 GMT -5
Thank you Feyona. The part that was missing was "In edit mode select all vertices, click on b__Head__ bone, and click "assign"
I was just hitting the assign button while in object mode with no vertices highlighted. It Now works. TY again.
|
|


