How to easily import a Sims 3 mesh to Blender from .package
May 31, 2015 11:56:32 GMT -5
brujah, esmeralda, and 16 more like this
Post by orangemittens on May 31, 2015 11:56:32 GMT -5
Introduction:
This tutorial will show you how to easily import a Sims 3 mesh into Blender directly from a Sims 3 .package. Note, this method will not import meshes from Sims 3 Packs although there is an easy to use tool that can convert Sim 3 Packs to .packages available. Esmeralda wrote a tutorial showing how to extract Sims 3 .packages for conversion to Sims 4 and that covers how to convert Sims 3 Packs to .package format. These two tutorials can be used for both CAS and object .packages and Sims 3 Packs. Note that the images/maps for CAS items differ significantly from Sims 3 to Sims 4. This tutorial does not show how to convert objects or CAS items...it simply shows how to get a Sims 3 mesh into Blender.
It should also be noted that this tutorial is not being shared so people can take the meshes of Sims 3 creators without their permission. Please play nice guys...don't take someone else's hard work without their permission.
What you will need:
A Sims 3 .package
Blender 2.70
ClipTool
Sims 3 Sim rigs - available at the same link as ClipTool (only needed if you're trying to open CAS items)
Installing ClipTool into Blender:
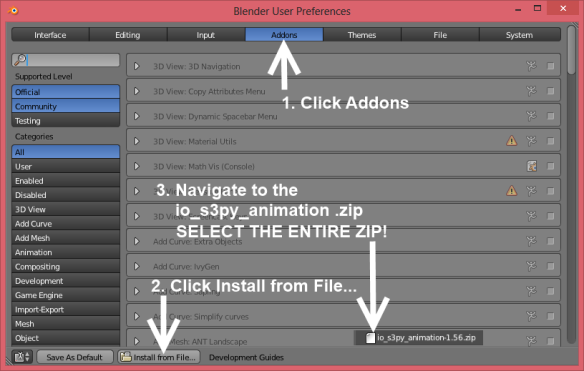
Open blender select File in the upper left corner. Choose User Preferences from the Menu. When the User Preferences box pops up:
1. Click Addons.
2. Click Install from File.
3. Navigate to the .zip file you downloaded and select it. Do not select the contents of the .zip - select the entire .zip itself.
Once that's done enable the addon by doing the following -
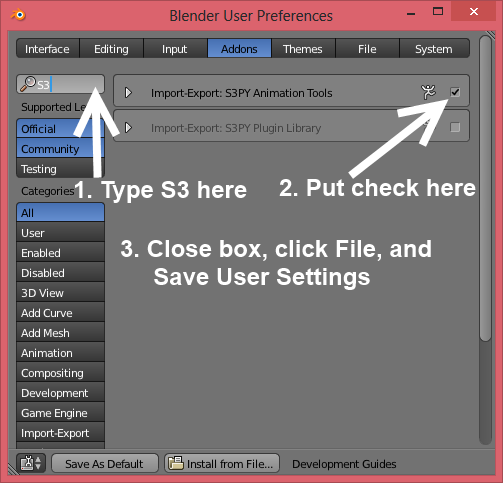
1. Type S3 into the search box.
2. When Import-Export: S3PY Animation Tools comes up put a check in the box.
3. Close the User Preferences box. Click file in the upper left corner again and choose Save User Settings.
Importing a Sims 3 mesh using ClipTool:
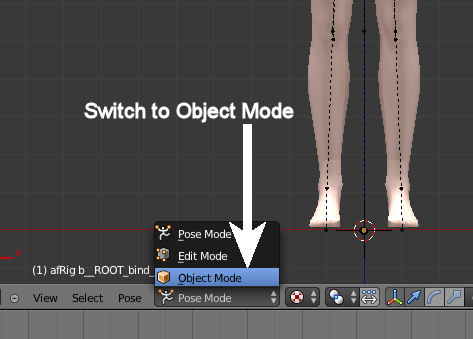
Make sure you are in Object Mode.
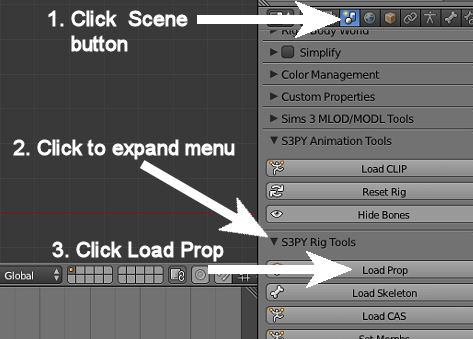
Click the Scene button.
Click the down arrowhead next to the S3PY Rig Tools menu header.
Click Load Prop.
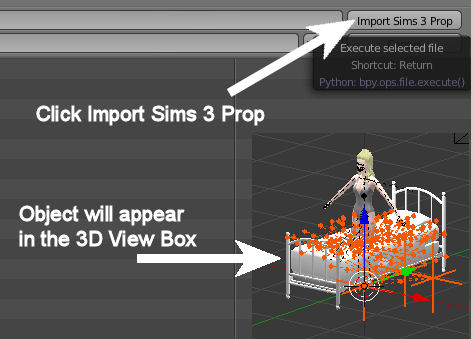
Navigate to the Sims 3 .package you want the mesh from, select it, and click Import Sims 3 Prop in the upper right corner.
The object will then appear in your 3D View Box.
Opening a Sims 3 CAS item works much the same way. The big difference is that you will first need to open a Sims 3 Sim rig in Blender first in order to make the Load CAS button show up. The Sims 3 Sim rig set is available at the same link as the ClipTool itself. Extract the rig you want to use and then open it with Blender. Once the Sim rig is open in Blender you can click the Load CAS button and navigate to where you have the Sims 3.package saved. Select the Sims 3 .package and click the Load Prop button in the upper right corner of the popup screen. If you want to hide parts of the Sim rig to better view what you've imported you can do so by clicking the little eye on the same line as the part you want to hide. For example, I loaded this Savio hair and in order to see it better I hid the hair that comes with the Sims 3 Sim rig:

This tutorial will show you how to easily import a Sims 3 mesh into Blender directly from a Sims 3 .package. Note, this method will not import meshes from Sims 3 Packs although there is an easy to use tool that can convert Sim 3 Packs to .packages available. Esmeralda wrote a tutorial showing how to extract Sims 3 .packages for conversion to Sims 4 and that covers how to convert Sims 3 Packs to .package format. These two tutorials can be used for both CAS and object .packages and Sims 3 Packs. Note that the images/maps for CAS items differ significantly from Sims 3 to Sims 4. This tutorial does not show how to convert objects or CAS items...it simply shows how to get a Sims 3 mesh into Blender.
It should also be noted that this tutorial is not being shared so people can take the meshes of Sims 3 creators without their permission. Please play nice guys...don't take someone else's hard work without their permission.
What you will need:
A Sims 3 .package
Blender 2.70
ClipTool
Sims 3 Sim rigs - available at the same link as ClipTool (only needed if you're trying to open CAS items)
Installing ClipTool into Blender:
Open blender select File in the upper left corner. Choose User Preferences from the Menu. When the User Preferences box pops up:
1. Click Addons.
2. Click Install from File.
3. Navigate to the .zip file you downloaded and select it. Do not select the contents of the .zip - select the entire .zip itself.

Once that's done enable the addon by doing the following -
1. Type S3 into the search box.
2. When Import-Export: S3PY Animation Tools comes up put a check in the box.
3. Close the User Preferences box. Click file in the upper left corner again and choose Save User Settings.

Importing a Sims 3 mesh using ClipTool:
Make sure you are in Object Mode.

Click the Scene button.
Click the down arrowhead next to the S3PY Rig Tools menu header.
Click Load Prop.

Navigate to the Sims 3 .package you want the mesh from, select it, and click Import Sims 3 Prop in the upper right corner.
The object will then appear in your 3D View Box.

Opening a Sims 3 CAS item works much the same way. The big difference is that you will first need to open a Sims 3 Sim rig in Blender first in order to make the Load CAS button show up. The Sims 3 Sim rig set is available at the same link as the ClipTool itself. Extract the rig you want to use and then open it with Blender. Once the Sim rig is open in Blender you can click the Load CAS button and navigate to where you have the Sims 3.package saved. Select the Sims 3 .package and click the Load Prop button in the upper right corner of the popup screen. If you want to hide parts of the Sim rig to better view what you've imported you can do so by clicking the little eye on the same line as the part you want to hide. For example, I loaded this Savio hair and in order to see it better I hid the hair that comes with the Sims 3 Sim rig:


