|
|
Post by orangemittens on Sept 23, 2014 10:05:55 GMT -5
When you first get the EA accessory into Blender you can check its bone assignment by using the following steps: 1. Go into Edit Mode. 2. Change the shading on the model to solid. 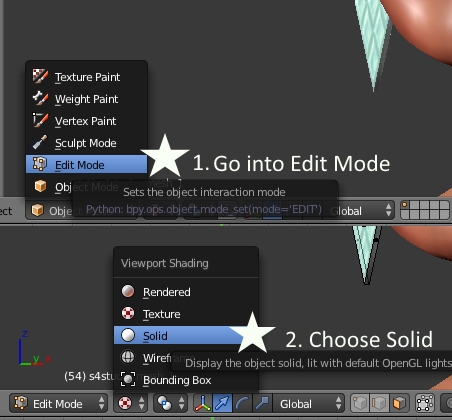 3. Click the n button on your keyboard to bring up a menus bar on the right side of the viewport window. Scroll down until you see the Mesh Display menu and click Show Weights. 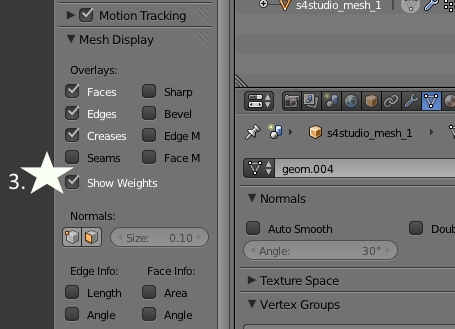 4. Click the Object Data button - it looks like a little upside down triangle. 5. In the Vertex Groups section you will find a list of the joints present in the mesh. 6. Click on the joints one by one until you find the one that makes the accessory turn bright red. This is the joint that the accessory is assigned to and the one that you will need to assign your new accessory to. 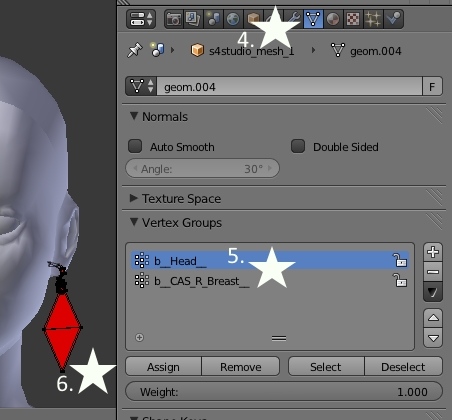 7. You can check the assignment on your own item using the same steps to check that your bone assignment is correct before you save it. If you have any questions about the tutorial please post them here |
|
|
|
Post by Starfire on Nov 3, 2014 11:42:09 GMT -5
Not sure if it's a question to this tutorial because this is bascially about finding the right joint to assign to, but what do I do if I don't have a "red" weight but two green ones? I just checked yf_Acc_NeckChokerSpikes_red because I tried to create something and it isn't showing up, and then I realised I didn't check the vertex groups this time. But I don't find any info on the exact weight on the vertices so I don't think I can apply these weights on my object. 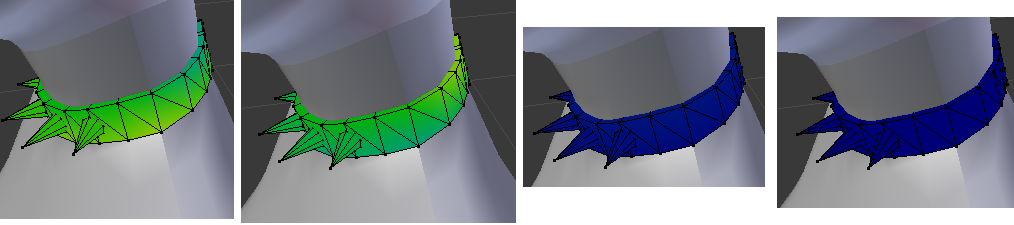 Those are the four vertex weights I have on the original mesh. I don't think that I need to give the names of the vertex groups, it should'n matter for just copying the weight values. And also I think the third vertex weight isn't the same dark blue as the fourth is, so I think I should add a very small weight (since blue seems to be "not assigned") to the third group as well? I think I can assign values to the vertices just fine, but I can't see what values they have in the original mesh. If this should be a new thread and not an answer here I'm sorry about that, I just thought it would fit here and others might get the problem as well because I don't think this will be the only item with it. |
|
|
|
Post by orangemittens on Nov 3, 2014 15:58:55 GMT -5
Starfire, this link has an illustration showing Blender's weight scheme: Weight Paint in a nutshell
If you decide to attempt weighting the necklace keep in mind that the total weight assigned to any given vertex cannot exceed 100%.
Also, necklaces require a very precise second UV map in order to function correctly in the game. Because designing the second UV map is very poorly understood at this time it is difficult, if not impossible, to get a new custom necklace into the game that won't distort. For this reason it's unclear if S4S should even be cloning necklaces right now because there is such a low probability for success on a project that is based on one. |
|
|
|
Post by woof0woof on Nov 21, 2014 10:54:42 GMT -5
Hello, It's me again. I made the swatch thumbnail color and add UV_1, but problem stays:( Maybe I make wrong UV_1 map... I tried use different mesh clones, but nothing changes.   |
|
|
|
Post by orangemittens on Nov 21, 2014 11:44:08 GMT -5
It looks like your mesh is not mapped. You need to map the mesh onto both UV_0 and UV_1. If the item is not mapped it will not show up correctly in the game. You also need to check that the item is assigned completely to the b_Head__ joint.
|
|
|
|
Post by woof0woof on Nov 21, 2014 12:08:38 GMT -5
Where I can learn how make right UV_1? Should I check that the item is assigned completely to the b_Head__ joint to milkshape or I can make it to Blender?
|
|
|
|
Post by orangemittens on Nov 21, 2014 12:28:48 GMT -5
You don't need Milkshape and using Blender is fine. You can do this whole process in Blender with no need for Milkshape at all. You need to map the item. It is not on the map on the left side of the screen you are showing a picture of.
Here is an example:

Go to this thread and look at the link in the last post:
Blender Tutorials |
|
|
|
Post by mamangateau on Nov 22, 2014 15:52:41 GMT -5
In blender, I have 2 bones for the bracelet EA then I verified by following the tutorial.
Bone 1: the bracelet becomes red
Bone 2 the bracelet becomes blue.
As a result, I wonder what is the function of the 2nd bone, do i also need to assign it?
|
|
|
|
Post by orangemittens on Nov 22, 2014 17:40:26 GMT -5
If you are making a bracelet the best way to have it work correctly is to make it as similar to EA's as possible with the exception of the appearance of the mesh. If EA has used only a single joint then you should use the same one they did and only that one.  |
|
|
|
Post by mamangateau on Nov 23, 2014 9:02:15 GMT -5
Thanks a lot
|
|
|
|
Post by Simsfan9911 on May 10, 2015 9:04:05 GMT -5
Hello, for som reason my new mesh of a top i made seems to be assigning itself to the hand which i dont want:  For some reason i cant seem to remove it either as when i click romove nothing happens. Really stuck with this new top! |
|
|
|
Post by orangemittens on May 10, 2015 9:24:28 GMT -5
Click the a key on your keyboard to select all the vertices and then click the Remove button. |
|
|
|
Post by Simsfan9911 on May 10, 2015 9:36:27 GMT -5
Thanks Orangemittens, just a random question, one that i should have probably asked someone before i started but is it possible to create a totally brand new cas top from scratch? Im not very good at editing im better at making brand new meshes. Ive made the mesh only i have no idea how to get the top to actually work propperly in game when you change the body shape. I dont know if i need to assign joints or something?
|
|
|
|
Post by Simsfan9911 on May 10, 2015 12:12:49 GMT -5
Lol managed to get the brand new top mesh it in game and it works. i was playing with UV's in blender but it comes up black in game lol  Ill give up for now. |
|
|
|
Post by Simsfan9911 on May 10, 2015 12:15:06 GMT -5
Ok so everything works in game except the arms.
|
|


